
快速上手

本章节介绍了UCP示例包 ucp_tutorial 中HPL模块的示例使用方法,以及如何配置开发环境、编译并运行示例应用代码,帮助快速上手UCP中的HPL功能模块。其主要架构如下:
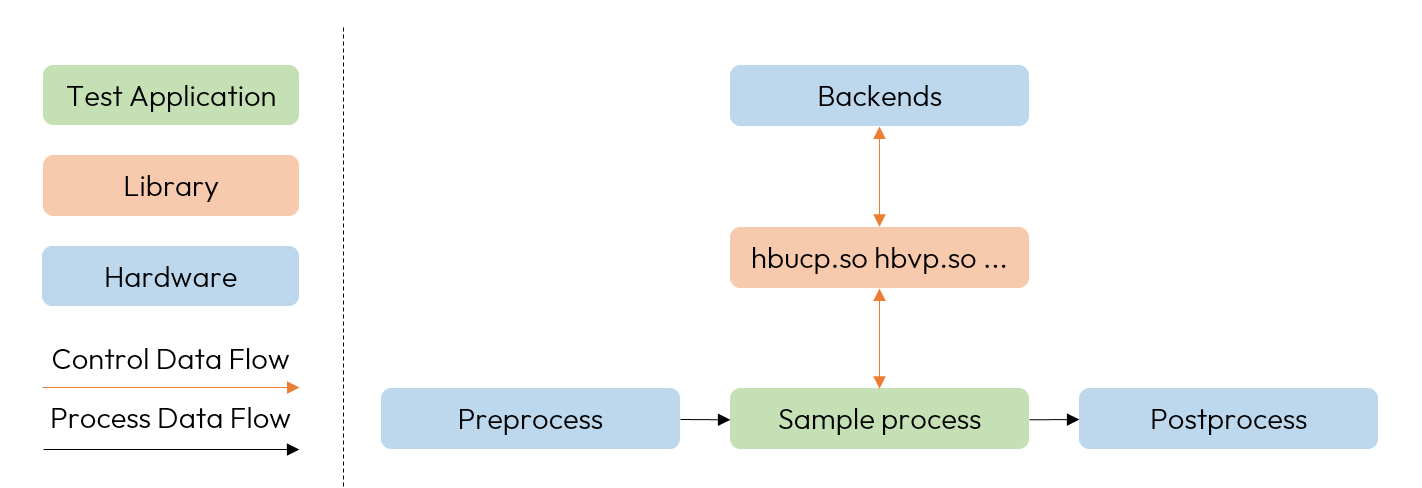
HPL2Structure

示例包使用

​示例包结构如下所示:

ucp_tutorial
├── deps_aarch64                         // aarch64 公共依赖目录   
│   ├── some libs                        // 其他三方依赖库
│   └── ucp                              // UCP 依赖库及头文件,包含dnn/vp/ucp/hpl/dsp开发
├── deps_x86                             // x86仿真 公共依赖目录   
│   ├── some libs                        // 其他三方依赖库
│   └── ucp                              // UCP 依赖库及头文件
├── dnn                                  // dnn示例
├── tools                                // 工具
├── vp                                   // vp示例
└── hpl                                  // hpl示例
    ├── code                             // 示例源码目录
    |   ├── 01_fft_ifft_transform        // fft ifft转换示例
    |   ├── util                         // 公共代码目录
    │   ├── build_aarch64.sh             // aarch64示例编译脚本
    |   ├── build.sh                     // 编译hpl示例最小可执行环境脚本
    │   ├── build_x86.sh                 // x86仿真示例编译脚本
    |   └── CMakeLists.txt               // cmake文件
    └── hpl_samples                      // hpl示例最小可执行环境
        ├── data                         // 数据目录
        ├── script                       // aarch64示例脚本目录
        │   ├── 01_fft_ifft_transform    // 示例脚本目录
        |   └── dsp_deploy.sh            // 部署板上的dsp运行环境脚本
        └── script_x86                   // x86仿真示例脚本目录
            ├── 01_fft_ifft_transform    // 示例脚本目录
            └── README.md                // readme文件

其中 ucp_tutorial/hpl 文件夹为HPL模块的示例,包括了快速傅里叶变换示例等,可同时支持板端运行编译和x86仿真编译两种方式。 具体的示例原理及实现流程请查阅 示例 章节。

编译示例算子

在编译运行示例应用代码前,您需要确保环境满足要求,根据 环境部署 部分的指引,您的开发机中应该已经安装有相关环境,要求如下:

  • cmake >= 3.0。

  • 对于板端编译需要指定交叉编译工具链,对于x86仿真docker自带编译器即可。

在示例的 ucp_tutorial/hpl/code 目录下有预先配置好的编译脚本 build.sh,当前支持编译选项 -a x86-a aarch64 两种编译方式, 直接执行 build.sh 脚本即可完成一键编译,生成的文件会被保存到 ucp_tutorial/hpl/hpl_samples 目录下。 此外,目录中也包含了 build_aarch64.shbuild_x86.sh 两个编译脚本,分别对应了两个编译选项, 使用这两个脚本进行编译与使用 build.sh 脚本等效。 编译x86仿真的HPL示例需要执行的命令如下:

cd ucp_tutorial/hpl/code
sh build_x86.sh

执行编译脚本后,会生成运行示例所需要的执行程序和依赖文件,保存在 ucp_tutorial/hpl/hpl_samples 目录下。

以HPL为例,其生成物如下所示,包含图片数据、示例运行脚本、运行依赖库、可执行文件以及运行示例的脚本目录,共同组成了完整的运行环境和运行依赖。

hpl_samples
├── data                         // 数据目录
└── script_x86                   // x86仿真示例脚本目录
    ├── 01_fft_ifft_transform    // 示例脚本目录
    ├── x86                      // 编译产生可执行文件、依赖库目录
    └── README.md                // readme文件

运行示例

正确地完成编译的全部步骤后,可执行示例会被配置完毕并保存在 hpl_samples 文件夹内。下面根据执行环境不同,介绍上板与仿真两种运行示例的方式。

上板运行

hpl_samples 文件夹整个拷贝到开发板上,进入 hpl_samples/script 文件夹,直接执行示例文件夹中提供的运行脚本即可看到示例的运行结果。 开发板上执行脚本的参考指令如下:

cd hpl_samples

cd script

# 由于部分算子依赖dsp后端,因此需要刷新dsp镜像,此操作可选,对于不需要dsp执行或者x86仿真可跳过
sh dsp_deploy.sh

# 运行示例
cd 01_fft_ifft_transform
sh run_fft_ifft_tranform.sh 

x86仿真运行

进入 hpl_samples/script_x86 文件夹,直接执行示例文件夹中提供的运行脚本即可看到示例的运行结果。 执行脚本的参考指令如下:

cd hpl_samples

cd script_x86

# 运行示例
cd 01_fft_ifft_transform
sh run_fft_ifft_tranform.sh
注解

地平线J6 SOC使用的是Cadence公司的Tensilica Vision Q8 DSP,因此x86仿真实例中dsp算子运行依赖Cadence提供的一套工具链,环境配置可参考 DSP工具链安装 的指引, 需要正确配置 License 以及环境变量 XTENSA_ROOT 即可。

输出物说明

以x86仿真运行为例,示例运行时会在控制台内打印流程日志并生成对应输出文件。日志中会包含全部算子的调用流程,输出结果会被保存在 data 文件夹中。示例部分输出如下:

[user@machine 01_fft_ifft_transform]$ sh run_fft_ifft_tranform.sh 
x86 only support direct mode 
[UCP]: log level = 3
[UCP]: UCP version = 3.0.3
[VP]: log level = 3
[DNN]: log level = 3
[I][24033][02-29][16:07:46:652][fft_ifft_process.cpp:171][fft_ifft_transform_sample][FFT_IFFT_TRANSFO] FFT IFFT process begin
......
[I][24033][02-29][16:08:25:265][fft_ifft_process.cpp:181][fft_ifft_transform_sample][FFT_IFFT_TRANSFO] FFT IFFT process finish
[C][24070][02-29][16:08:25:272][cmodel_cli.cpp:172][fft_ifft_transform_sample][dsp] [C] DSP ISS exit

生成物会被保存到 hpl_samples/data 目录下,内容如下:

user@machine:/ucp_sample/hpl_samples/data# ls
fft1d_input_f32.txt  fft1d_output_f32.txt  ifft1d_output_f32.txt  input_image_f32.jpg  output_image_f32.jpg  README.md

HPL算子使用实例

本节通过一个简单的算子调用展示了如何使用HPL封装的算子实现快速傅里叶变换的功能。主要步骤包含了数据载入、任务创建、任务提交、任务完成、销毁任务、保存输出等。您可以阅读相应源码和注释进行学习。

该示例的作用为使用hbFFT1D算子对输入数据进行FFT变换,具体实现如下:

#include <cstring>

#include "util.h"
#include "log_util.h"
#include "hobot/hpl/hb_fft.h"

// Fill the input memory with data
hbUCPSysMem src_re_mem, src_im_mem, dst_re_mem, dst_im_mem;
int32_t src_length = 1024 * 4;
hbUCPMallocCached(&src_re_mem, src_length, 0);
hbUCPMallocCached(&src_im_mem, src_length, 0);
hbUCPMallocCached(&dst_re_mem, src_length, 0);
hbUCPMallocCached(&dst_im_mem, src_length, 0);

// Fill the input memory with data
std::string src_img = "./fft_input.txt";
std::ifstream ifs(src_path, std::ios::in | std::ios::binary);
ifs.read(static_cast<char *>(src_re_mem.virAddr), src_length);
ifs.read(static_cast<char *>(src_im_mem.virAddr), src_length);
hbUCPMemFlush(&src_re_mem, HB_SYS_MEM_CACHE_CLEAN);
hbUCPMemFlush(&src_im_mem, HB_SYS_MEM_CACHE_CLEAN);

// Fill the input and output information
hbHPLImaginaryData src, dst;
src.realDataVirAddr = src_re_mem.virAddr;
src.realDataPhyAddr = src_re_mem.phyAddr;
src.imDataVirAddr = src_im_mem.virAddr;
src.imDataPhyAddr = src_im_mem.phyAddr;
src.numDimensionSize = 1;
src.dataType = HB_HPL_DATA_TYPE_I16;
src.imFormat = HB_IM_FORMAT_SEPARATE;
src.dimensionSize[0] = src_length / sizeof(int16_t);

dst.realDataVirAddr = dst_re_mem.virAddr;
dst.realDataPhyAddr = dst_re_mem.phyAddr;
dst.imDataVirAddr = dst_im_mem.virAddr;
dst.imDataPhyAddr = dst_im_mem.phyAddr;
dst.numDimensionSize = 1;
dst.dataType = HB_HPL_DATA_TYPE_I16;
dst.imFormat = HB_IM_FORMAT_SEPARATE;
dst.dimensionSize[0] = src_length / sizeof(int16_t);

// Fill the operator parameter
hbFFTParam param;
param.pSize = HB_HPL_FFT32;
param.normalize = 0;

// Create a task through the operator interface provided by HPL, the task handle can be set to nullptr, 
// and this task will be executed in synchronized mode
hbUCPTaskHandle_t task_handle{nullptr};

// Set scheduling parameters to adjust task priority, select execution terminals etc
hbUCPSchedParam sched_param;
HB_UCP_INITIALIZE_SCHED_PARAM(&sched_param);
sched_param.backend = HB_UCP_DSP_CORE_0;  // Specify the execution device ID
sched_param.priority = 0;                 // Specify task priority

hbFFT1D(&task_handle,  // UCP task handle
        &dst,          // output data
        &src,          // input data
        &param         // operator parameter
        );

// Set scheduling parameters to adjust task priority, select execution terminals etc
hbUCPSchedParam sched_param;
HB_UCP_INITIALIZE_SCHED_PARAM(&sched_param);
sched_param.backend = HB_UCP_DSP_CORE_0; /*Specify the execution device ID*/

// Submit the task
hbUCPSubmitTask(task_handle, &sched_param);

// Wait for the task to complete, set the timeout parameter, a value of 0 means to wait all the time
hbUCPWaitTaskDone(task_handle, 0);

// Release the task handle
hbUCPReleaseTask(task_handle);

// Release the memory resource
hbUCPFree(&src_re_mem);
hbUCPFree(&src_im_mem);
hbUCPFree(&dst_re_mem);
hbUCPFree(&dst_im_mem);