> 统一计算平台(UCP) > 视觉处理开发 > 视觉算法 > JPEG Codec 算子效果
原理
JPEG(Joint Photographic Experts Group)是一个广泛使用的有损压缩标准,由联合图像专家小组开发,并已成为国际通用的图像压缩标准。
JPEG不仅适用于静态图像编码,还被推广用于电视图像序列的帧内压缩。JPU硬件支持的JPEG标准是ISO/IEC 10918-1的Baseline Sequential模式。
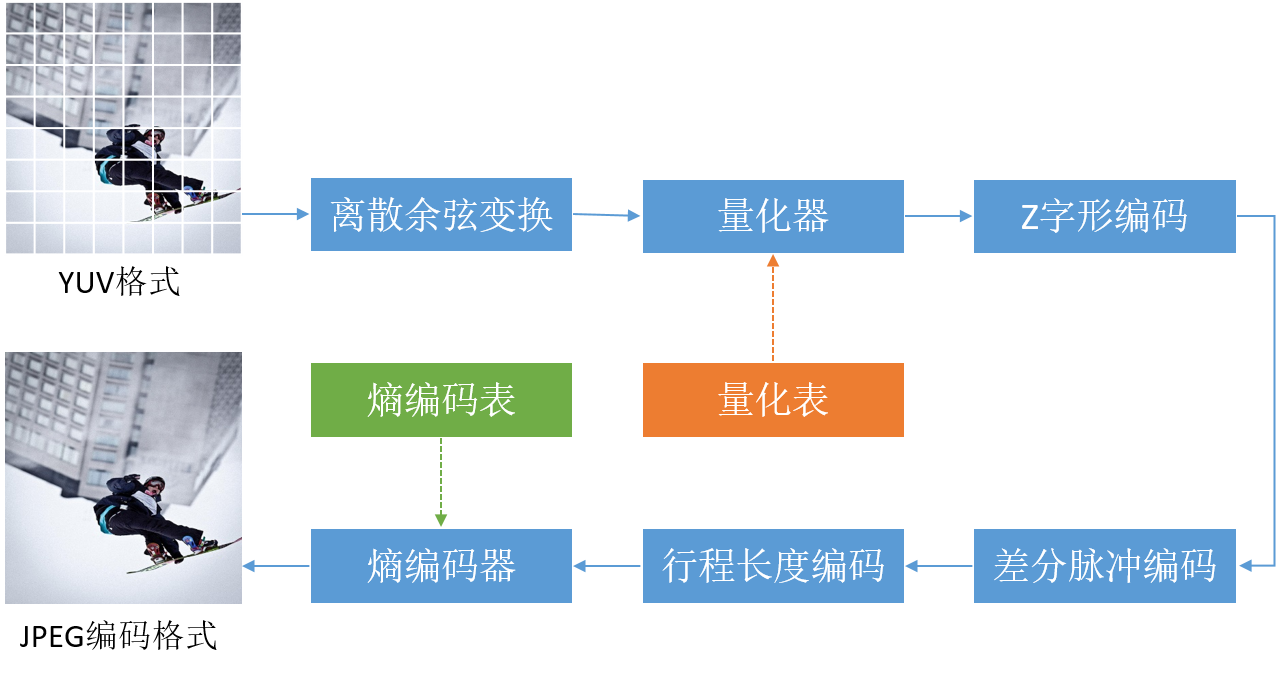
JPEG编码原理
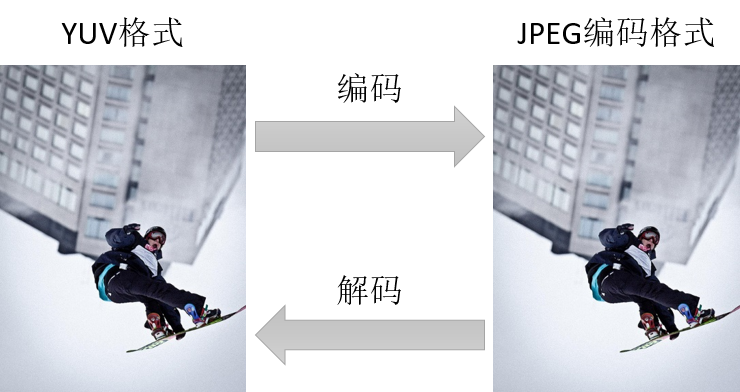
JPEG编码,将YUV格式图片编码成JPEG压缩格式的图片文件,例如*.jpg。
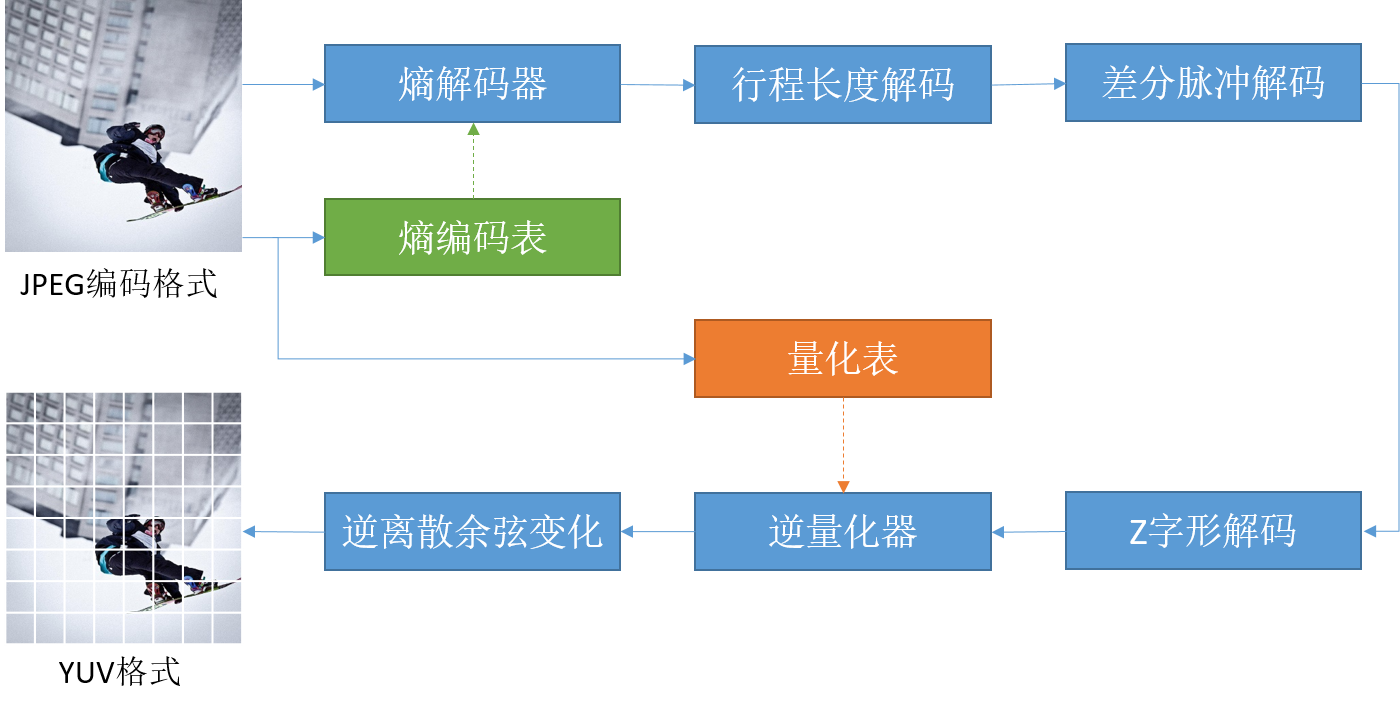
JPEG解码原理
JPEG解码,实现.jpg、.jpeg、.JPG、.JPEG图片文件的解码。
以图像的某个8x8子区域为例,介绍JPEG编码的主要过程。8x8图像子区域数值如下所示:
[ 52 55 61 66 70 61 64 73 63 59 55 90 109 85 69 72 62 59 68 113 144 104 66 73 63 58 71 122 154 106 70 69 67 61 68 104 126 88 68 70 79 65 60 70 77 68 58 75 85 71 64 59 55 61 65 83 87 79 69 68 65 76 78 94 ] \begin{aligned}\begin{bmatrix} 52 & 55 & 61 & 66 & 70 & 61 & 64 & 73\\ 63 & 59 & 55 & 90 & 109 & 85 & 69 & 72\\ 62 & 59 & 68 & 113 & 144 & 104 & 66 & 73\\ 63 & 58 & 71 & 122 & 154 & 106 & 70 & 69\\ 67 & 61 & 68 & 104 & 126 & 88 & 68 & 70\\ 79 & 65 & 60 & 70 & 77 & 68 & 58 & 75\\ 85 & 71 & 64 & 59 & 55 & 61 & 65 & 83\\ 87 & 79 & 69 & 68 & 65 & 76 & 78 & 94\\ \end{bmatrix}\end{aligned} 52 63 62 63 67 79 85 87 55 59 59 58 61 65 71 79 61 55 68 71 68 60 64 69 66 90 113 122 104 70 59 68 70 109 144 154 126 77 55 65 61 85 104 106 88 68 61 76 64 69 66 70 68 58 65 78 73 72 73 69 70 75 83 94
首先对8x8子区域进行二维的离散余弦变化(Discrete Cosine Transform,DCT),目的是将YUV颜色空间转换至频域空间。
由于离散余弦变化所接受的数值范围是[-128, 127],故将8x8图像子区域数值减去-128,得到如下矩阵:
[ − 76 − 73 − 67 − 62 − 58 − 67 − 64 − 55 − 65 − 69 − 73 − 38 − 19 − 43 − 59 − 56 − 66 − 69 − 60 − 15 16 − 24 − 62 − 55 − 65 − 70 − 57 − 6 26 − 22 − 58 − 59 − 61 − 67 − 60 − 24 − 2 − 40 − 60 − 58 − 49 − 63 − 68 − 58 − 51 − 60 − 70 − 53 − 43 − 57 − 64 − 69 − 73 − 67 − 63 − 45 − 41 − 49 − 59 − 60 − 63 − 52 − 50 − 34 ] \begin{aligned}\begin{bmatrix} -76&-73&-67&-62&-58&-67&-64&-55\\ -65&-69&-73&-38&-19&-43&-59&-56\\ -66&-69&-60&-15&16&-24&-62&-55\\ -65&-70&-57&-6&26&-22&-58&-59\\ -61&-67&-60&-24&-2&-40&-60&-58\\ -49&-63&-68&-58&-51&-60&-70&-53\\ -43&-57&-64&-69&-73&-67&-63&-45\\ -41&-49&-59&-60&-63&-52&-50&-34 \end{bmatrix}\end{aligned} − 76 − 65 − 66 − 65 − 61 − 49 − 43 − 41 − 73 − 69 − 69 − 70 − 67 − 63 − 57 − 49 − 67 − 73 − 60 − 57 − 60 − 68 − 64 − 59 − 62 − 38 − 15 − 6 − 24 − 58 − 69 − 60 − 58 − 19 16 26 − 2 − 51 − 73 − 63 − 67 − 43 − 24 − 22 − 40 − 60 − 67 − 52 − 64 − 59 − 62 − 58 − 60 − 70 − 63 − 50 − 55 − 56 − 55 − 59 − 58 − 53 − 45 − 34
标准化后矩阵进行DCT,变换公式:
F ( u , v ) = 1 4 C ( u ) C ( v ) [ ∑ m = 0 7 ∑ n = 0 7 f ( m , n ) c o s ( 2 m + 1 ) u π 16 c o s ( 2 n + 1 ) v π 16 ] F(u,v)=\cfrac{1}{4}C(u)C(v)[\displaystyle\sum_{m=0}^{7} \displaystyle\sum_{n=0}^{7}f(m,n)cos\cfrac{(2m+1)u\pi}{16}cos\cfrac{(2n+1)v\pi}{16}] F ( u , v ) = 4 1 C ( u ) C ( v ) [ m = 0 ∑ 7 n = 0 ∑ 7 f ( m , n ) cos 16 ( 2 m + 1 ) u π cos 16 ( 2 n + 1 ) v π ]
变换后得到DCT系数矩阵:
[ − 415 − 30 − 61 27 56 − 20 − 2 0 4 − 22 − 61 10 13 − 7 − 9 5 − 47 7 77 − 25 − 29 10 5 − 6 − 49 12 34 − 15 − 10 6 2 2 12 − 7 − 13 − 4 − 2 2 − 3 3 − 8 3 2 − 6 − 2 1 4 2 − 1 0 0 − 2 − 1 − 3 4 − 1 0 0 − 1 − 4 − 1 0 1 2 ] \begin{aligned}\begin{bmatrix} -415&-30&-61&27&56&-20&-2&0\\ 4&-22&-61&10&13&-7&-9&5\\ -47&7&77&-25&-29&10&5&-6\\ -49&12&34&-15&-10&6&2&2\\ 12&-7&-13&-4&-2&2&-3&3\\ -8&3&2&-6&-2&1&4&2\\ -1&0&0&-2&-1&-3&4&-1\\ 0&0&-1&-4&-1&0&1&2\end{bmatrix}\end{aligned} − 415 4 − 47 − 49 12 − 8 − 1 0 − 30 − 22 7 12 − 7 3 0 0 − 61 − 61 77 34 − 13 2 0 − 1 27 10 − 25 − 15 − 4 − 6 − 2 − 4 56 13 − 29 − 10 − 2 − 2 − 1 − 1 − 20 − 7 10 6 2 1 − 3 0 − 2 − 9 5 2 − 3 4 4 1 0 5 − 6 2 3 2 − 1 2
其中(0,0)点处的系数称作直流分量(DC系数),其余63个点的系数称为交流分量(AC系数)。
其次对亮度和色度分量的DCT系数进行量化,即DCT系数除以量化表后按四舍五入取最接近的整数。
由于人眼对亮度信号比对色差信号更敏感,因此使用了亮度分量和色度分量两种量化表,默认的量化表是从广泛的实验中得出,也可自定义量化表。
亮度分量默认的量化表:
[ 16 11 10 16 24 40 51 61 12 12 14 19 26 58 60 55 14 13 16 24 40 57 69 56 14 17 22 29 51 87 80 62 18 22 37 56 68 109 103 77 24 35 55 64 81 104 113 92 49 64 78 87 103 121 120 101 72 92 95 98 112 100 103 99 ] \begin{aligned}\begin{bmatrix} 16& 11& 10& 16& 24& 40& 51& 61 \\ 12& 12& 14& 19& 26& 58& 60& 55 \\ 14& 13& 16& 24& 40& 57& 69& 56\\ 14& 17& 22& 29& 51& 87& 80& 62\\ 18& 22& 37& 56& 68& 109& 103& 77\\ 24& 35& 55& 64& 81& 104& 113& 92\\ 49& 64& 78& 87& 103& 121& 120& 101\\ 72& 92& 95& 98& 112& 100& 103& 99\\ \end{bmatrix}\end{aligned} 16 12 14 14 18 24 49 72 11 12 13 17 22 35 64 92 10 14 16 22 37 55 78 95 16 19 24 29 56 64 87 98 24 26 40 51 68 81 103 112 40 58 57 87 109 104 121 100 51 60 69 80 103 113 120 103 61 55 56 62 77 92 101 99
色度分量默认的量化表:
[ 17 18 24 47 99 99 99 99 18 21 26 66 99 99 99 99 24 26 56 99 99 99 99 99 47 66 99 99 99 99 99 99 99 99 99 99 99 99 99 99 99 99 99 99 99 99 99 99 99 99 99 99 99 99 99 99 99 99 99 99 99 99 99 99 ] \begin{aligned}\begin{bmatrix} 17 & 18 & 24 & 47 & 99 & 99 & 99 & 99\\ 18 & 21 & 26 & 66 & 99 & 99 & 99 & 99\\ 24 & 26 & 56 & 99 & 99 & 99 & 99 & 99\\ 47 & 66 & 99 & 99 & 99 & 99 & 99 & 99\\ 99 & 99 & 99 & 99 & 99 & 99 & 99 & 99\\ 99 & 99 & 99 & 99 & 99 & 99 & 99 & 99\\ 99 & 99 & 99 & 99 & 99 & 99 & 99 & 99\\ 99 & 99 & 99 & 99 & 99 & 99 & 99 & 99\\ \end{bmatrix}\end{aligned} 17 18 24 47 99 99 99 99 18 21 26 66 99 99 99 99 24 26 56 99 99 99 99 99 47 66 99 99 99 99 99 99 99 99 99 99 99 99 99 99 99 99 99 99 99 99 99 99 99 99 99 99 99 99 99 99 99 99 99 99 99 99 99 99
将前面所得到的DCT系数矩阵与默认值的亮度表进行相除,并四舍五入后可得到量化后的DCT系数:
[ − 26 − 3 − 6 2 2 − 1 0 0 0 − 2 − 4 1 1 0 0 0 − 3 1 5 − 1 − 1 0 0 0 − 4 1 2 − 1 0 0 0 0 1 0 0 0 0 0 0 0 0 0 0 0 0 0 0 0 0 0 0 0 0 0 0 0 0 0 0 0 0 0 0 0 ] \begin{aligned}\begin{bmatrix} -26 & -3 & -6 & 2 & 2 & -1 & 0 & 0\\ 0 & -2 & -4 & 1 & 1 & 0 & 0 & 0\\ -3 & 1 & 5 & -1 & -1 & 0 & 0 & 0\\ -4 & 1 & 2 & -1 & 0 & 0 & 0 & 0\\ 1 & 0 & 0 & 0 & 0 & 0 & 0 & 0\\ 0 & 0 & 0 & 0 & 0 & 0 & 0 & 0\\ 0 & 0 & 0 & 0 & 0 & 0 & 0 & 0\\ 0 & 0 & 0 & 0 & 0 & 0 & 0 & 0\\ \end{bmatrix}\end{aligned} − 26 0 − 3 − 4 1 0 0 0 − 3 − 2 1 1 0 0 0 0 − 6 − 4 5 2 0 0 0 0 2 1 − 1 − 1 0 0 0 0 2 1 − 1 0 0 0 0 0 − 1 0 0 0 0 0 0 0 0 0 0 0 0 0 0 0 0 0 0 0 0 0 0 0
观察到量化后的DCT系数量化后的数据,直流系数相对于交流系数更大一些,并且交流系数种含有大量的0。
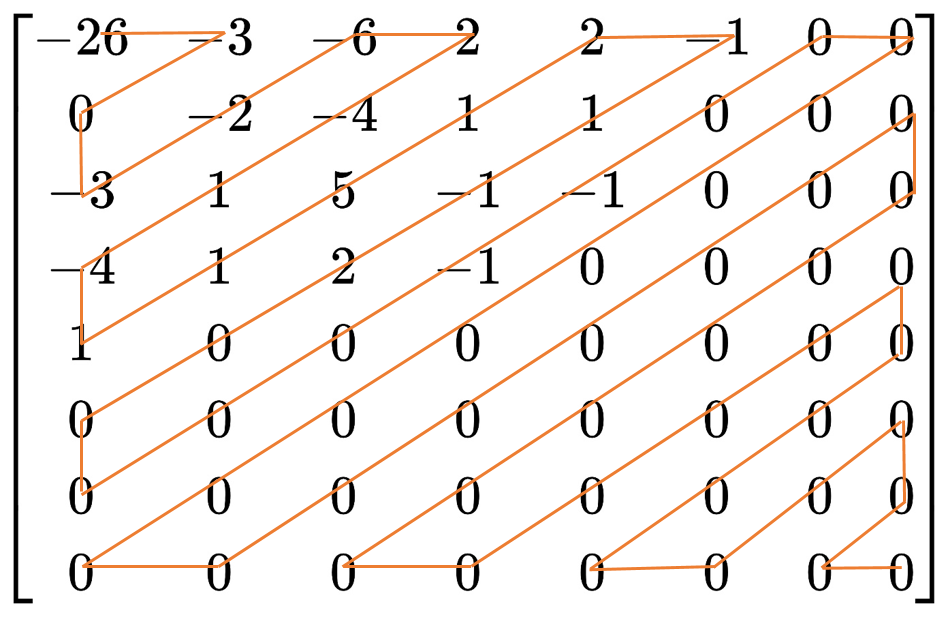
因此使用Z字形编码可将大量的0连接到一起,以减小编码后的大小。
主要思路就是从量化后的DCT系数左上角第一个像素开始以Z字形进行编排:
由于Z字形编码后的DCT系数的直流系数数值较大,并且相邻8x8图像区域的直流系数值变化不大,因此使用差分脉冲编码技术,对相邻图像区域之间DC系数的差值进行编码;对交流系数重复且连续出现多次的字符,使用行程长度编码。这两种编码方式都有中间格式,目的是进一步减小存储量。
得到 DC 系数的中间格式和 AC 系数的中间格式之后,为进一步压缩图像数据,需要对两者进行熵编码,通过对出现概率较高的字符采用较小的 bit 数编码达到压缩的目的。
JPEG 基本系统规定采用 Huffman 编码方法, Huffman 编码时 DC 系数与 AC 系数分别采用不同的 Huffman 编码表,对于亮度和色度也采用不同的 Huffman 编码表。
因此,需要 4 张 Huffman 编码表才能完成熵编码的工作,等到具体 Huffman 编码时再采用查表的方式来高效地完成。
然而,在 JPEG 标准中没有定义缺省的 Huffman 表,您可以根据实际应用自由选择,也可以使用 JPEG 标准推荐的 Huffman 表,或者预先定义一个通用的 Huffman 表,也可以针对一副特定的图像,在压缩编码前通过搜集其统计特征来计算 Huffman 表的值。
API接口
JPEG编码接口
// create JPEG encoding context int32_t hbVPCreateJPEGEncContext (hbVPJPEGContext * context , hbVPJPEGEncParam * param); // JPEG encoding API interface int32_t hbVPJPEGEncode ( hbUCPTaskHandle_t * taskHandle , hbVPImage const * srcImg , hbVPJPEGContext context); // get JPEG encoding ouptput buffer int32_t hbVPGetJPEGEncOutputBuffer (hbVPArray * outBuf , hbUCPTaskHandle_t taskHandle); // release JPEG encoding context int32_t hbVPReleaseJPEGEncContext (hbVPJPEGContext context); JPEG解码接口
// create JPEG decoding context int32_t hbVPCreateJPEGDecContext (hbVPJPEGContext * context , uint32_t outBufCount , uint8_t imageFormat); // JPEG decoding API interface int32_t hbVPJPEGDecode ( hbUCPTaskHandle_t * taskHandle , hbVPArray const * srcBuf , hbVPJPEGContext context); // get JPEG decoding ouptput buffer int32_t hbVPGetJPEGDecOutputBuffer (hbVPImage * outImg , hbUCPTaskHandle_t taskHandle); // release JPEG decoding context int32_t hbVPReleaseJPEGDecContext (hbVPJPEGContext context); 详细接口信息请查看 hbVPJPEGEncode 及 hbVPJPEGDecode 。
使用方法
JPEG编码使用方法
// Include the header #include "hobot/hb_ucp.h" #include "hobot/vp/hb_vp.h" #include "hobot/vp/hb_vp_jpeg_codec.h" // init image_buf, alloc memory for image data hbUCPSysMem image_mem; hbUCPMalloc ( & image_mem , yuv_size , 0 ); hbVPImage image_buf = hbVPImage{HB_VP_IMAGE_FORMAT_YUV420 , HB_VP_IMAGE_TYPE_U8C1 , width , height , stride , image_mem . virAddr , image_mem . phyAddr , nullptr , 0 , 0 }; // init jpeg_buf hbVPArray jpeg_buf{ 0 }; // init encoding param hbVPJPEGEncParam enc_param; enc_param.qualityFactor = 50 ; enc_param.extendedSequential = 0 ; enc_param.width = width; enc_param.height = height; enc_param.imageFormat = image_format; enc_param.outBufCount = 5 ; // create encoding context and the JPU internally alloc the output buffer hbVPJPEGContext enc_context{nullptr}; hbVPCreateJPEGEncContext ( & enc_context , & enc_param); // init task handle and schedule param hbUCPTaskHandle_t task_handle{nullptr}; hbUCPSchedParam sched_param; HB_UCP_INITIALIZE_SCHED_PARAM ( & sched_param); sched_param.backend = HB_UCP_JPU_CORE_0; sched_param.priority = 0 ; // create encoding task hbVPJPEGEncode ( & task_handle , & image_buf , enc_context); // submit encoding task hbUCPSubmitTask (task_handle , & sched_param); // wait for encoding task done hbUCPWaitTaskDone (task_handle , 0 ); // get encoded buffer from JPU hbVPGetJPEGEncOutputBuffer ( & jpeg_buf , taskHandle); // process jpeg data // release task handle and dequeue output buffer from JPU // since the dequeue output buffer process relies on the context, // you must call the hbUCPReleaseTask interface before calling the hbVPReleaseJPEGEncContext interface hbUCPReleaseTask (task_handle); // release encoding context and the JPU internally release the output buffer hbVPReleaseJPEGEncContext (enc_context); // release memory hbUCPFree ( & image_mem); JPEG解码使用方法
// Include the header #include "hobot/hb_ucp.h" #include "hobot/vp/hb_vp.h" #include "hobot/vp/hb_vp_jpeg_codec.h" // init jpeg_buf, alloc memory for jpeg data hbUCPSysMem jpeg_mem; hbUCPMalloc ( & jpeg_mem , jpeg_size , 0 ); hbVPArray jpeg_buf; jpeg_buf.phyAddr = jpeg_mem.phyAddr; jpeg_buf.virAddr = jpeg_mem.virAddr; jpeg_buf.memSize = jpeg_mem.memSize; jpeg_buf.size = jpeg_mem.memSize; jpeg_buf.capacity = jpeg_mem.memSize; // init image_buf hbVPImage image_buf{ 0 }; // create decoding context and the JPU internally alloc the output buffer hbVPJPEGContext dec_context{nullptr}; hbVPCreateJPEGDecContext ( & dec_context , 5 , image_format); // init task handle and schedule param hbUCPTaskHandle_t task_handle{nullptr}; hbUCPSchedParam sched_param; HB_UCP_INITIALIZE_SCHED_PARAM ( & sched_param); sched_param.backend = HB_UCP_JPU_CORE_0; sched_param.priority = 0 ; // create decoding task hbVPJPEGDecode ( & task_handle , & jpeg_buf , dec_context); // submit decoding task hbUCPSubmitTask (task_handle , & sched_param); // wait for decoding task done hbUCPWaitTaskDone (task_handle , 0 ); // get decoded buffer from JPU hbVPGetJPEGDecOutputBuffer ( & image_buf , task_handle); // process image data // release task handle and dequeue output buffer from JPU // since the dequeue output buffer process relies on the context, // you must call the hbUCPReleaseTask interface before calling the hbVPReleaseJPEGEncContext interface hbUCPReleaseTask (task_handle); // release encoding context and the JPU internally release the output buffer hbVPReleaseJPEGDecContext (dec_context); // release memory hbUCPFree ( & jpeg_mem);